 |
| Our 76 V-Dub |
So you wanna buy / build-a-bug right?
I'm making this blog for anyone that is interested in restoring bugs (or cars in general) and to note some of the trials and tribulations I encountered while doing so.First, I gained inspiration by lookin at some kewl bugs online. These were a few of my favs...


the Red one below is a wide body. Id still like to know what mirrors those are on this car. Love to get a set of them!


The one below on the right was actually a brown colour. I photoshopped it blue and added the flames just to see what it would look like. ⬇

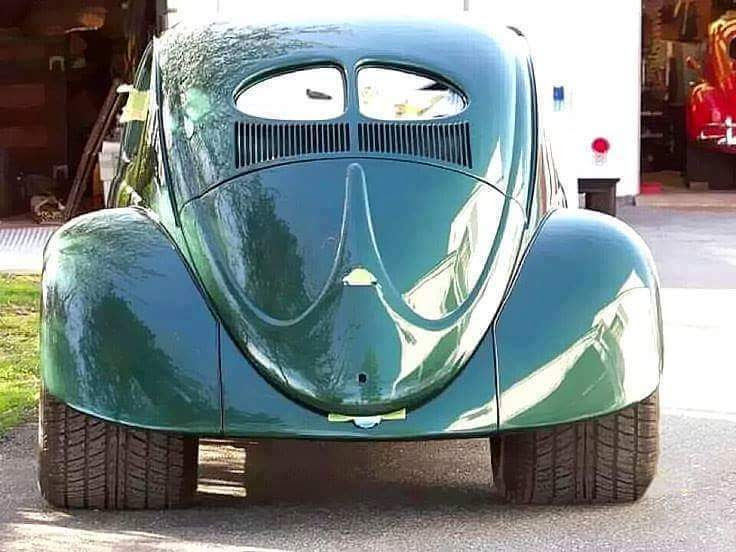
I first met our V-Dub in 2014....
Nice lookin car. I towed the car home since I couldn't drive two vehicles. The first winter, I worked on the car in my unheated garage, some days - 20C to -30C some nights! .. It was so cold, I used a heat gun to bring the blood back to my fingers and toes from time to time!


Exterior was recently painted, interior needed work. It had Empi rims and it sat higher in the front than the back.


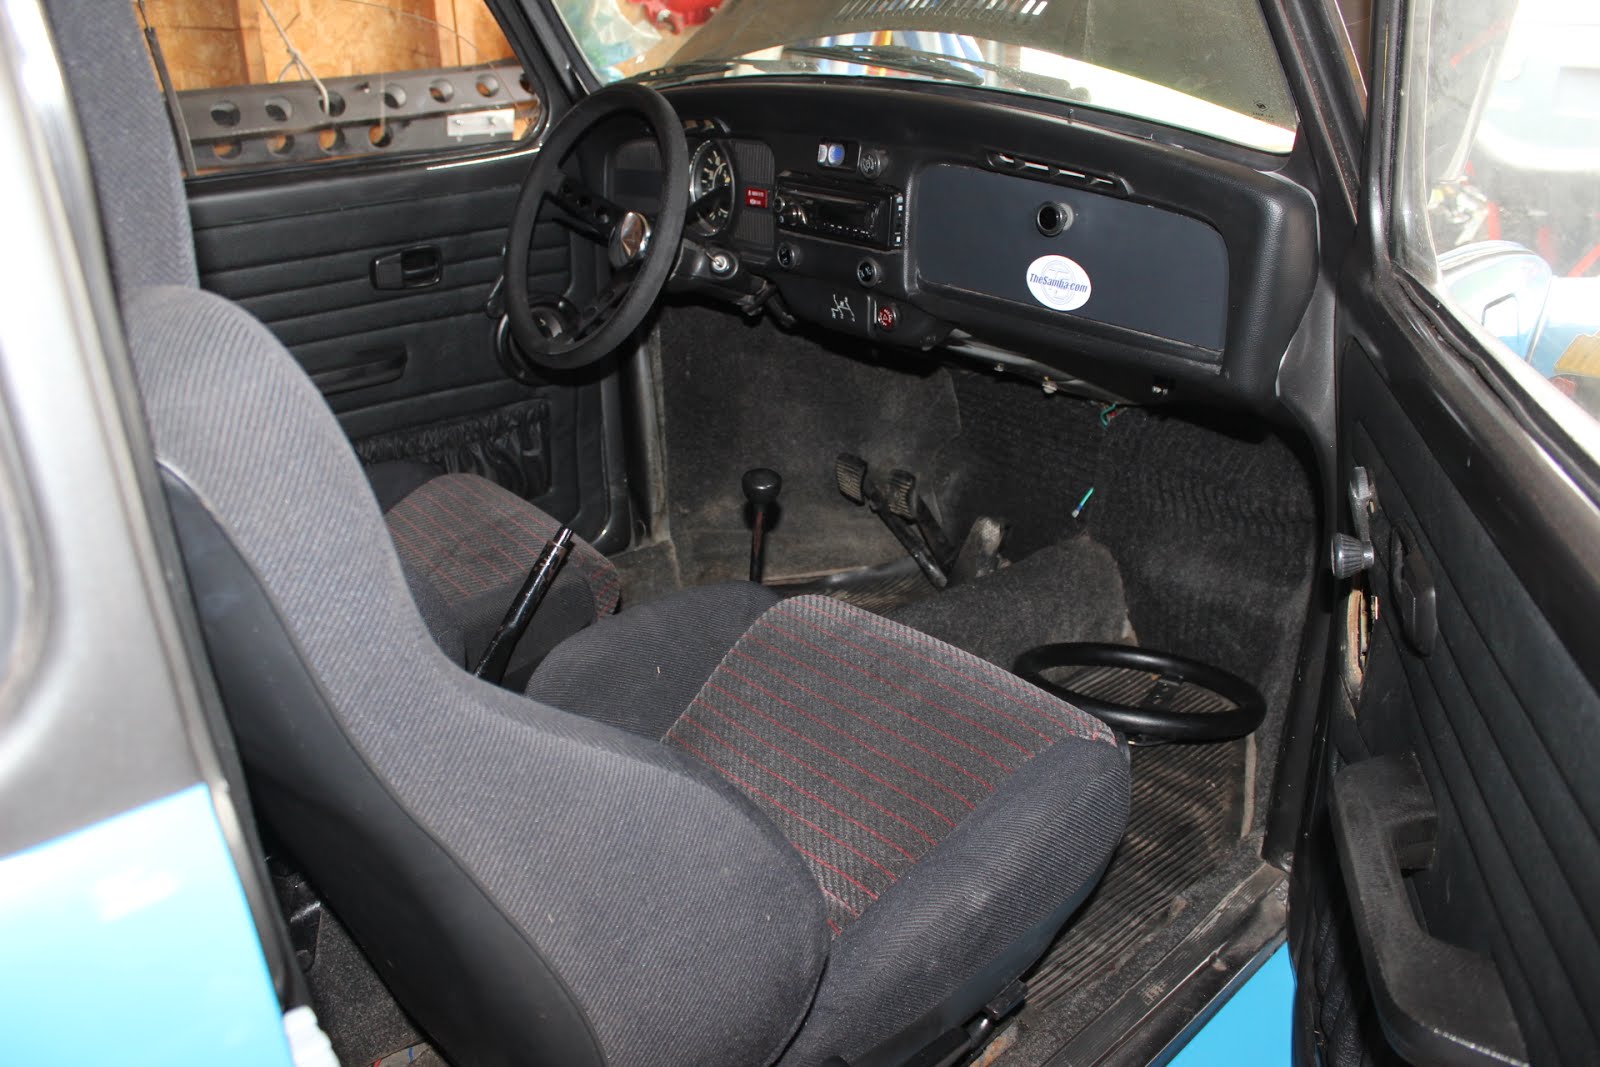
Those original seats offered zero support so I changed them to buckets out of a Honda as you will see in the progression.
First, I changed the front drum brakes to disks!

put all new brake lines, master cylinder and reservoir
 |
| original drum brakes |
 |
| shiny new disks |
Installed lowered spindles which lower the front by 2.5 inches
 |
| You can see the BJRT there in the above pic |
changed the ball joints... Oh mi Goodnis Gracius! What a job that was!
 |
| (Old one) |


I'm callin these "The Psycho Ball Joints from HELL!
.... If we were to make a Psycho Horror Science Fiction Movie, we couldn't possibly make it more horrible! But NO CAR ever beats ME!


DId I mention it was COLD in this garage!? Some nights, -20, -30C!

Put DragLite Centerlines with new rubber. The Centerlines were off a 914 Porsche. The wheels and tires were wider than stock so I didn't want to risk narrowing the beam only to find out that the new tires and wheels wouldn't fit.
 Even if I wanted to keep the rims the car came with, they did not match up with the new disk brakes. The new brake calipers rubbed on the inside of the rims! I tried using more washers on one side to move the caliper in, away from the rim but then the brakes would bind and the clearances where just not enough. So I really had no choice but to change them.
I've restored a few classic cars over the years and I've always loved the Centerline rims. They are "Old School" and and really light! Today they are brutally expensive and I also had to do some machine work to them, beveling the holes so the lug nuts would center on them properly. [Just that alone was a job in itself! I had to take the rims to a machine shop. I kept checking in on them and they had not even started the work yet! After couple of months waiting for them to simply give me a price, I visited the shop and took the rims to another shop.]
When you lower the car you have couple of options. Either a) narrow the front beam OR b) you have to go for wider fenders. I like the wide, low, racy look so I opted for the fenders, only as I found out, there is no longer anyone in Canada making aftermarket fenders for early volkswagen.
Luckily, through contacts, I found a set of new, fiberglass aftermarket fenders though a freind. They were 2 inches wider than stock so I rushed out and bought them.
However I found out later they were for a "SuperBeetle" not the original, standard "Type 1". In any case, the rear fenders mounted fine but on a Super, the hood is longer and a bit higher too so the front fenders would not work.
Since I already had the rear fenders, I contacted a company out in Arizona that made aftermarket fiberglass fenders. I bought 2inch wider front fenders from them as well as the 2 inch rockers to match.
 |
| these were the wrong front fenders I bought that turned out being for a Super Beetle. Very difficult to tell the difference without actually trying to match them to the car. |
They come undrilled, so it's up to you to "match" the bolt pattern on the car to your plastic fenders and skirts. This was a job on its own. I tried templating the car, then moving the template to the new fenders which sort of worked but not like you would imagine.
They "looked" like they wanted to fit, or maybe it was just me wanting to see them fit because I knew if they didn't work, Id be into another 2k! Thats right! By the time you buy the fenders and running boards from the US, change the dollar, ship them here, pay taxes and duty, then buy paint and have them painted... ya. And that's not including my own time, labour, countless trips to various stores for various tools and supplies. Truly a labour of "love".


Below were the original steel fenders. They went to a car in Ottawa. They were in perfect shape but they just would not fit the wider tire/rim combination.

So then the new fiberglass showed up from Arizona. Now there were two challenges;
First, they had to be drilled, mounted to make sure they fit BEFORE being painted, then removed again, then send to the paint shop, then returned, then remounted again.
 |
| 2 inch wider fenders |
 |
| 2 inch wider running boards |
I had to tape some cardboard together, then try to line up the bolt holes in the car, to the cardboard, far more difficult than I imagined. See, you're not dealing with flat surfaces.. You're dealing with 3 dimensional space, so after you remove the cardboard, it's moving around and not fitting perfectly against the new fenders. Took lots of trial and error... did I mention it was COLD!? These pics, its now starting to warm up enough that I could open the garage doors but you're still workin outside with no heat.

So here I am mounting the plastic for the first time. You can see how much wider these are than the originals. Overall the car is 4 inches wider.


Don't forget the rear fenders are from the first set I bought. I could use the rears but not the fronts, so I had to order the fronts from Arizona.. For those of you reading this from Canada, realise your talkin dollar difference, shipping, duty AND taxes. So it turns out to be an expensive proposition to do this. THEN you have to get them PAINTED that's not inexpensive either!

Rear Suspension
When doing a project like this, you have to organize your time too. I knew the fenders would be at the paint shop for some time, so they needed to be fitted, removed, shipped to the painter so I could continue to work on other things like lowering the rear suspension BUT I also needed the fenders to be able to see how low I could go before the tires started to rub on the fenders. You see, "one thing is always contingent on another!"Having the car on the stands was one thing but when you put it back on the ground, this is when you have to tune the suspension.. and for that, you need the fenders mounted.
To adjust the rear suspension is not too hard after you get the hang of it but there are lots of things you have to know. First is that the rear torsion bar is UNDER LOTS OF PRESSURE! YOU CAN SERIOUSLY GET A FINGER OR HAND CHOPPED OFF IF YOU ARE NOT CAREFUL! IF YOU HAVE ANY DOUBT ABOUT THIS WORK OR YOUR ABILITIES, DON'T DO IT! GET A PROFESSIONAL!
ok having said that, there are lots of helpful videos already made. No sense me recreating the wheel so here is one to help you get started. Im not going to do into great depth about this since the point of this blog is to show people the work that went into this car.
So this video is NOT the subject car were talkin about.. it's just a video to show you the scope of the work. (mine's in much better shape).
The guy in the video does some hackin and cuttin. I never did any of that. I found a way to pop the torsion bar over the rear trailing arm of the suspension using a pry bar and a jack. Basically I pushed the rear suspension up as far as possible, then pried the torsion bar away from its.. there's a lip it sits on that prevents the torsion spring from rising the car too much. I dunno what you call it BUT if you pry this out without a jack under it, it IS UNDER LOAD and it goes POW down like a SWORD! If you got your hands anywhere near this.. oh mi goodnis gracius!
Anyway doing this releases the tension from the torsion spring and now you can pull the spring bar out of the car to move the splines to your settings.
There are two splines, inner and outer, the outer ones are further apart. One spline = about 1 inch of height. The Inner ones are smaller and closer together and they = about 1/2 inch so if you pulled the torsion bar out and put it back one inner spline (tooth) differnt, your car would be 1/2 inch higher or lower.
There's a casing that holds the torsion bar in place. The casing has three bolts. Then there are three bolts on the rear trailing suspension arm. Its really quite simple once you see it but you have to know about torsion bars and the tension they are under.
A morbid thought that kept going though my head while working alone was that if my finger or hand ever got caught between these parts, I would not likely be able to free myself with one free hand and nehter be able to call for help since I would be stuck to the car. Im writing all this for newbies thinkin they can get into a v-dub for cheap and its easy. This is a reality check for most people. I wish this blog existed before I bought my v-dub. And thats comin from someone who was in the car business for many years after high school. I had built / restored several race cars and bikes before this!
You also need a level gauge with a magnet. What happens is you have to measure the angle of your rear suspension on one side, and try to repeat this perfectly on the other so your car is not sittin high on one side.


Above ⬆you can see I lowered it too much and I cannot get my fingers between the fender and the tire.
 Here it's sitting about right.. then I had to remove the fenders and send them for paint.

⬅
And believe me, even after you think you have it right, I was tweakin the rear suspension several times even after the car was ready for the road. If you ever intent to have 4 people in the car, you need a bit of travel! I know "slammed" looks kewl but you are goin nowhere! So you have to find a compromise.
Matching the paint
So I got the fenders back. Matching the paint was another job in itself. What I did was take the cas filler door off and ran it to a NAPA AUTO store that had a camera that could tell us what paint it was. Once we had the codes, it was easy to buy the paint BUT the rest of the car also had a metal flake in it, so my painter had to add that to it. Paint matched perfectly and now I have the codes so the next owner will benefit from that work too (nothing is forever).
This was an exciting day because for the first time I got to see what the car was going to look like painted and 4 inches wider and it looked awesome!
 |
| my brother helpin out |
 |
| no lack of busted tools. Drives, spanners, ratchet and some others. |


 |
| before |
Now remember we were talkin about that interior before... heres the new Honda seats...Also changed the steering wheel it came with. it was so small my hands would hit the wiper controls and being rack and pinion unassisted steering, it was hard to park with a tiny wheel so I got one that was larger in diameter but also deeper to keep fingers off the flicker and wiper controls. Doesn't seem like a lot but these little things keep adding up. Plus things you'd never think of like, I needed more space in the garage.....
 |
| after |


 |
| My son Alex and I |
 |
| Me comin inside trying to thaw out. |


I worked on the car day and night over the winter, didn't even stop to shave!
I had to make parts too.. For instance I changed the exhaust to stainless steel but the new exhaust came with hot air return holes but this car is fuel injected so it does not have hot air returns to the carb(s) so the holes had to be capped. I made some caps out of aluminum so they would not rust and used the gaskets that came with the SS Exhaust to stop air leaks.


Here you can see the application.

and here's the stainless steel exhaust

So sexy right!?


Classic car porn! :D

Finally, after werkin on it over the winter, it was finally on the ground for the first time.

Still had to rewire the lights for the new fenders.


Then came some regular maintenance
I set the valves, changed the oil, cleaned the strainer (old v-dubs dont have an oil filter as we know it... its a strainer. Some people just open the oil pan screw, drain the old oil and put new but you should clean the strainer each time too. This way you can inspect it for metal shavings or other debris. You need a "kit" to do this. gaskets for the strainer, they come in 10 packs. Not something Id let the Jiffy lube do though. I want to do it myself to make sure its done right.


I also change the valve cover gaskets, put new plugs and change the distributor points etc.
After many months of work in a cold garage, this V-Dub finally got to see some sunshine and wax!

THEN I sent it to a mechanic for safety check which you need in our parts in order to get a sticker for your plates. Got my safety and my sticker and we were FINALLY ready for our first ride. Everyone wanted to come so we had 4 in the car which was great!

I had a 1990 C2 Porsche before this. As a joke, we put 4 people in that car. My kids were squished up in the back on the jumper seats. Not fun. In the V-Dub however, they have lots of room there! There's even room behind the back seat for some "carry on" luggage!

 |
| Shelby and Alex first time in the v-dub for a ride :) |
 |
| My wife Marianne arriving at our first car show |
Out for a cruise with some friends

Impromptu gathering at the coffee shop


Cobourg Ontario Waterfront

My father was in the car business and after highschool, I got into the bus. too, buying, selling, fixing, rebuilding, restoring, cars, trucks, motorcycles, RV's, trailers.. we were also a dealer for Arctic Cat Snowmobiles.
Over the years of owning, fixing, restoring literally 100's of cars, I have to say, this V-Dub has got to be the most fun! It's not expensive, it's fantastic on gas! For $40.00 ($91 octane) I can fill the tank and run it around for weeks! It's a 4 speed standard and round town, you rarely use 4th, so really it's like a 3 speed!
Is it fast!?
I get asked this all the time, since it looks fast. Compared to some of the 1/4 mile cars I built in past the answer it HELL NO! It's a stock 1600cc Fuel Injected 4 cylinder, rear mounted, air cooled motor that produces 50HP! It's fast enough to get speeding tickets and round town, it's so light and nimble, it's like running a go-kart on the street! The whole car and motor is under 2000lbs. Most of todays cars are double that! Before this I owned a 1990 Porsche Carrera 2. That was a 250hp 6cyl, 5 spd. Sure it was faster but it also cost 4x as much and it was just not practical around todays suburban cities where average speed it basically bicycle speed.

Practicality You can't beat the v-dub for practically. Its by far, the best car on gas Ive ever owned (and Ive owned many)
Value it's going UP in value now, not down like most cars
Space Most of the time, people are by themselves in their cars or with one passenger which this car is perfect for. I have had 4 people in it and it has way more space in the back than my previous summer car the C2.
Insurance: As a summer or historic vehicle, it has specialty insurance that only cost $145.00 a year!

There were over 2 million VW Bugs built world wide. That's the most of any car and the longest production timeline of any vehicle. That says a lot.
As a rear engine, rear wheel drive car, traction is great and balance is near perfect. All over the world the bug is still a daily driver for millions of people. In this case, I only use it as a summer car since Canada salts their roads in winter instead of using sand like most other snowbound countries. If it weren't for the salt, this could easily be a daily driver.
In California for instance, this would certainly be a daily driver. There, they have an entire industry built around the VW culture. Such industry simply would not exist here in Canada.
Regular maintenance parts are inexpensive and the car is so simple, I change the oil myself and set the valve lash once a year to keep it perfectly tuned. This alone is such a relief, not being at mercy of specialized mechanics that you can't get a hold of or tell you one thing, then charge you another.
- There's no water cooling system (radiator) to worry about
- there's no power steering
- no electric windows
- if you want heat, you open the vents from the motor compartment to inside. If you don't want heat, you close them! Simple. All mechanical
- no computers like today's cars

Finally, I want to talk about the sheer charisma of this car. The odd person used to ask me about the Porsche.. EVERYONE asks about the V-Dub! It's like an iconic symbol of freedom!
Pretty much everywhere I stop with this car, people ask questions, give me the thumbs up. Some poeple video the car on their phones as you drive by... one person even followed me for miles till I stopped to ask questions about the car! Nearly everyone has a Vee Dubblya story to tell.
Hagerty Insurance is appraising an "Average" 1976 Bug at $12,300.00 CDN. Have a look...
After all that, the car was sold to a nice guy from Barrie.
~the end~
No comments:
Post a Comment